I'm playing with digital kits at the moment. Thanks to Lucy's tutorial I discovered some tricks so I'm all excited and can't think about anything else! So I thought that I'll share those things, maybe they will be useful for others.
Un kit digi (on en trouve des gratuits sur le net) est composé de plusieurs dossiers comprenant des brush (pour PS), des tampons et des extras (p.ex. des papiers, des boutons etc). Ces deux derniers peuvent être utilisé sous Word. Probablement pas sous les vieilles versions mais celles qui sont plus récentes, oui (sur le PC j'ai Word 2000 et ça marche!). Il faut télécharger le kit et l'enregistrer sur votre ordi. Il est probablement zippé donc il faut le... de-zipper. ;-)
A digital kit (there are some free on the net) contains a few files: one is with brushes (for PS), one with stamps, another with extras (papers, buttons and such). Those last two can be used with Word. I'm not sure about all versions but it works also on my old PC with Word 2000! You have to download the kit, save it somewhere on your computer and then unzip it.
Ouvrez un nouveau document dans Word et allez dans Insertion --> Image --> A partir du fichier. Chercher le kit qui vous intérésse et insérez p.ex. un papier. Ils sont souvent en format 12x12. Vous pouvez les formater pour les adapter à la taille de votre future card, p.ex. Pour cela, allez dans Format --> Image. S'ouvre une fenêtre avec plusieurs onglets. Allez dans Taille et là entrez les chiffre qui vous intéresse. Si vous ne voulez pas garder votre papier en carré mais préférez l'avoir en rectangle, décochez la case "Gardez le même rapport hauteur/largeur". --> OK Pour que votre image se trouve au bord de votre document, déplacez les marquers dans les marges.
In Word, open a new document then go to Insert --> Picture --> From file. Look up the kit that interests you and insert a paper for instance. These often come in 12x12 size. You can adapt them to the size of your future card. Go to Format --> Picture. A window will pop-up with some tabs. Go to Size and enter the numbers you need. If you want your card to be rectangular instead of square, un-check the "Lock aspect ratio" box. Click OK. In order to have your paper image close to the documents borders, move the sliders of the margins.
Ensuite, il est possible de superposer plusieurs images. Désélectionnez la première image (cliquez à côté). Allez de nouveau dans Insertion--> Image et choisissez la dans le dossier Tampons. La nouvelle image devrait se placer soit à côté de la première soit en dessous. Cliquez dessus et allez de nouveau dans Format --> Image --> Taille. Cette fois-ci, vous voulez gardez le rapport hauteur/largeur, gardez la case correspondante cochée. Il faut diminuer un peu un des chiffre, l'autre s'adaptera. Avant de cliquer OK, allet dans l'onglet Habillage et choisissez Devant le texte. Cliquez OK. Maintenant vous pouvez placer cette deuxième image par dessus la première.
Next, it is possible to layer another image on the first one. Click somewhere else on the document so that the 1st image is not selected. Then go again to Insert --> Picture and chose an image from the stamps file. The new image should appear either on the side of the 1st one or beneath it. Click on it and go to Format --> Image --> Size. This time you want to keep the ratio aspect so keep that box checked. You have to change the numbers though so that that image will be smaller than the 1st one. Before you click OK go to Layout tab and check the In front of the text option. Click OK. now you can grab that picture and place it over the first one.
Certains tampons sont déjà coloriés. Mais vous pouvez également changer cela. Format --> Image --> onglet Image --> Contrôle de l'image. C'est marqué Automatique, vous pouvez choisir Noir & Blanc. Comme ça, vous imprimerez une fois votre image en noir et blanc, puis une deuxième fois sur un autre papier en couleur pour découper cette deuxième image et la coller par dessus la première avec des pop-dots.
Some stamps are already colored. But you can change that as well. Format --> Picture --> Image control. It's Automatic but you can change that to something else like Black & White. Like this you can print your image once on the color paper and another time in a colored version and cut it out and place onto your card on pop-dots.
Ensuite, on peut encore ajouter du texte. Insertion --> Zone de texte. Cliquez et glissez votre curseur quelque part dans votre document pour dessiner une case. Double cliquez sur son bord, s'ouvre une fenêtre avec des onglets. Dans onglet "Couleurs et traits" choisissez Aucun remplissage et Aucun trait. Dans onglet Habillage, choisissez Devant le texte. --> OK Vous pouvez à présent glisser cette case par dessus votre image précédente. Cliquez à l'intérieur pour pouvoir écrire ce qui vous plaît. Pour formater ce texte (chager de police, de taille et de couleur) séléctionnez le texte, cliquez droit et choisissez Police. Changez ce que vous voulez.
Then, you can add some text. Insert --> Text box. Click and drag your cursor somewhere on your document to draw a box. Double click on its edge, a pop-up window will appear with some tags. In the Colors and Lines tag, chose No line and No fill. In the Layout tag, chose In front of the text option. --> OK You can now grab that box and place it over your previous work. Click inside it and write what you want. You can also format your sentiment (change the font style, size and color): select your text, right click and chose Font. Change whatever you want.
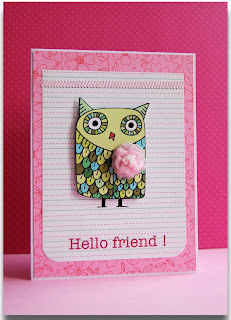
Et voilà! Il n'y a plus qu'à imprimer! C'est vraiment simple, il faut essayer, c'est super fun! En dessous un exemple de ce que ça donne une fois imprimé et monté. Vous pouvez voir le tuto de Lucy ainsi que la toute nouvelle vidéo de Jennifer MacGuire qui a fait une carte fabuleuse avec tout simplement un tampon digital imprimé sur du papier blanc. A bientôt!
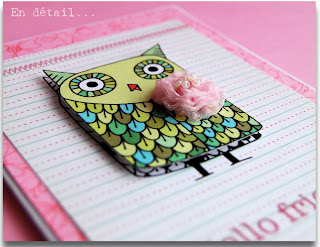
And that's it! Print is the next step! You have to give it a try, it IS simple and fun! Please find below an example of a card made that way. Visit also Lucy's blog and read her tutorial (she included some screen shots) and watch also Jennifer MacGuire's video. She made an incredible card with a simple digi stamp printed on a white card stock. See you later!

Matériel: papiers Bazzil et cartes de correspondance; kits digitaux HA et Michelle Underwood; tampon HA; encre Ranger; police American Typewriter; machine à coudre, ruban, perles


11 commentaires:
Euh...tu ne voudrais pas venir ici pour tout me reexpliquer en personne??!! :-D
Super ta carte ;-)
xox
Je veux bien venir mais si tu essaies de faire, tu vas tout comprendre toute seule comme une grande!!!
This is AWESOME! Love your step by step instructions (I can always learn a few things along the way..).I SO love what you did with this owl image! You are onto something BIG and FUN! enjoy!!
Delightful card! Thanks for the tutorial, you've given me some great tips!
blessings,
nancy
Thank you, AGAIN, Agata, for the great directions! Now if I was only at home with my computer that has Word on it. I'm saving this for future reference. Love your cute card, too!
Bienvenue dans le digiworld lol
Perso je ne fais que du digiscrap, mais parfois (trop rarement, mais là le père noel m'a offert une belle imprimante), j'imprime les papiers et je fais du scrap hybride et ça rend super bien !!!
Sinon je pense que word n'est pas forcément le logiciel le plus simple pour le faire, mais pourquoi pas ... Photoshop reste très onéreux, mais Gimp est gratuit !!
Je te laisse à tes expérimentations, en tout cas le résultat est superbe, très jolie cette carte hibou !
oh! that beautiful ribbon flower is just the perfect touch, Agata! love it!!
Super cute!
Super cute hybrid card! Love the dimension you gave the owl as well as the pretty flower embellishment!!
THIS is soooo adorable! I love this little tiny fabric flower, so so cute:)
coucou Agata...
Wouah merci pour toutes ces idées qu on trouve sur ton blog. Il manque juste le tuto pour avoir le temps !!!
me réjouis d'essayer les kits digitaux. Ce sera du nouveau. Et comme chaque fois qu'il y a du nouveau... je ne pense qu'à ça !!!
A bientôt
Françoise
Enregistrer un commentaire